
Next topic
Using the Everweb application
This page shows how to use the Everserve web application. It will cover commands
for community creation and delivery of a test package. Again, we start with
an overview of the steps that you will take.
Step one - since mySQL and Everserve installation on the
Community Manager is completed, you will return to the community manager and
launch the Web Application.
Step two - create the community definition and copy the
seed file to each participating system. Specific web application actions are
spelled out below. In addition to working in the browser, you will need to take
the seed file that is created in this step and copy it onto systems participating
in the community outside of the web application.
Step three - get Everserve installed onto all other systems,
copy the seed file, and join these systems to the community.
Step four - verify that all systems in the community
are active. Deliver a sample package and view the receipts.
Launch the Everweb application (Step one)
During installation you configured Everweb with a specific port number. The
process should be running in the background as a service. All you need do is
open a browser window to begin working with the application. The Everweb URL
includes the hostname of the publisher/community manager system that is running
this service. With the default port setting the URL looks like this:
http://<hostname>:8080/everserve
Launching the page results in a login window with text boxes for a username
and password. Any account name that is valid for login to the Everserve computer
operating system will work. Once you have successfully logged into the system
you will see the default "server" page.
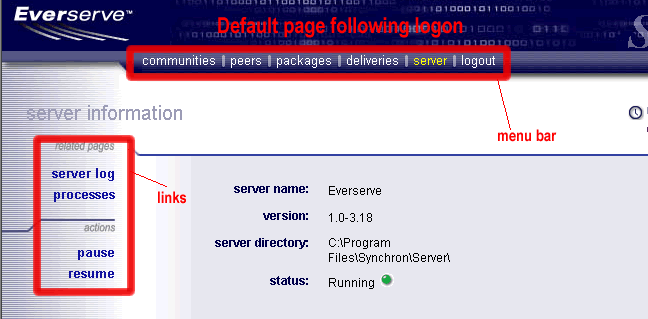
The command menu bar that appears across the top and the action links
that are seen on the left side of the page will be reference points for the
rest of the tutorial. This tutorial will put any reference to a place on the
screen that will be clicked by the mouse (such as the menu or links) in a bold
typeface.
Create the community (Step two)
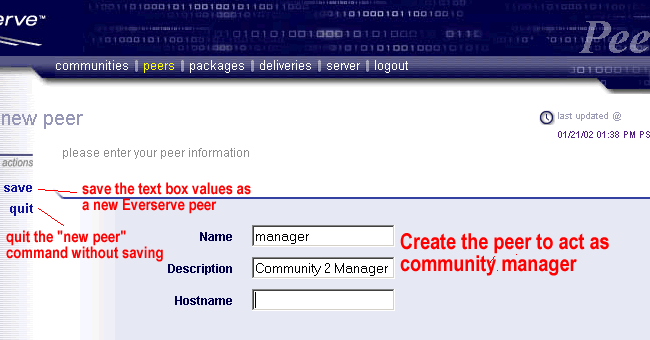
Click on the peers command menu item and then click on the create
new link. The window that appears will display empty text boxes labeled
Name, Description and Hostname. These are the same parameters we saw for "create
peer" when we reviewed the command line interface. Here you will type values
into the text boxes and finally click on the save link. For this example,
please type the following values into the corresponding text boxes:
Name - manager
Description - Community 2 Manager
Hostname - <system hostname - same as name in Everweb URL>
The page will look something like this:
Once you click the save link, the community manager peer will be created
and you will have the opportunity to fill the fields in for another new peer.
Instead, we will create a second community. It will be named community2, with
a peer named manager as the community manager. The same publisher peer and target
peer as community1 can be used. First click on the communities item from
the Everweb menu bar. The page will display the community we created previously
on the command line, "community1".
Click on the create new link found on the left side of the page and
the web application will open the Community window in your browser. It is very
similar to the Peer window we just saw:
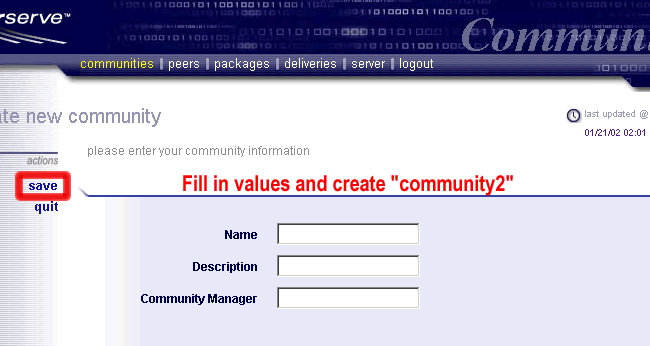
Type the following values into this window:
Name - community2
Description - Tutorial Community, Web example
Community Manager - manager
When you click on the save link you are brought back to the first Community
Page, the community list page. Now select "community2" from
your list of communities in order to reach the detail screen and add additional
peers.

Following the add peer link you choose a peername from the "peer"
dropdown list and the corresponding role for that peer from the dropdown list
labeled with role. Start by choosing the peer named pub and the publisher
role. Click on the add link on the left side of your page.
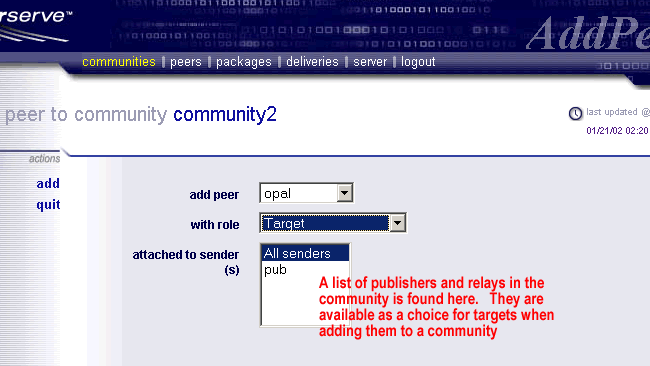
Next, follow the same steps to add the target to the community. Traverse from
the community page that lists all of the communities, to the details screen
under the link for community2 to the add peer screen. Choose the target
peer's name and the role of target.
Notice the attached to sender(s) list which appears last on this page.
This is used to attach targets to relays or to specific publishers when a more
complex community topology is being created. You need not change the selection
within this box during execution of the tutorial.
Once the publisher and target are added you can navigate to the peer list for
community2 and validate your work. First click on the "communities"
menu bar, then click on the link for "community2" among the
list of communities, last choose the "peers" link on the top
left side of the details page. This page shows a list of the peers in community2.
The "manager" and "pub" peers are active. The target peer
is not "Active" until the join command is executed on that remote
system.
Join other peers and enable the community (Step three)
At this point you can enable community2 in the same way that community1 was
enabled. Instead of copying the zipped seed file to the target(s) configured
in community2 the rest of the tutorial will use community1 to continue demonstration
of the web application features. Community1 is already configured with all defined
peers having an active status.
If you prefer, review Step Three
on the last tutorial page which documents command line community creation and
enable community2 for deliveries. In either case, please continue
on to the next page where you can verify the peers in community1, deliver
a simple package and view the receipts.